Recently I was introduced to Virus Insanity Eyeshadow by my friend Mary. She is well aware of my penchant for bright nasty colors and figured that I needed more in my collection. She was correct.
Jennifer, the proprietor of Virus Insanity sells off of her Facebook, but she also has an Etsy shop. I purchased 12 shadows a few weeks ago, and in the bright department, they certainly deliver. They blend as well as any mineral based pigment and her shades are particularly unique (a word I seldom get to use).
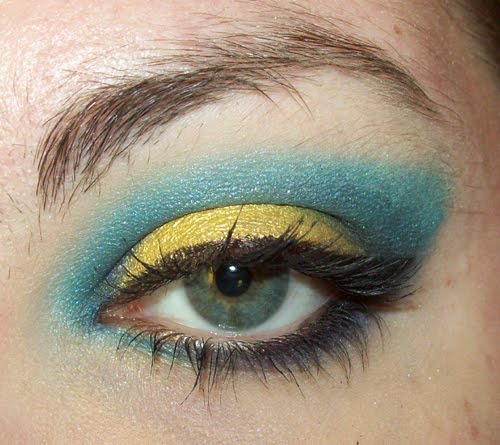
I did this look using four of her shadows.
Yeah, yeah...I know...stray hairs. I swear you can't see them in real life...my camera just likes to make me super embarrassed. Whatever...it is what it is.
So here is my very first picture tutorial. Feel free to comment, tell me what you love, tell me what you hate...I shall try to learn and not be a turbo bitch about it.
First off, product pictures. Here are all the things I've used in creating this look...in the future, I think I shall take one photo with all of the goodies in it.
The Shadows:

Explode - a super bright canary yellow.

Ocean Mystery - as if I needed more turquoise eyeshdaow right? This color is gorgeous...it has a bit of gold shimmer in.

Midnight Kiss - a deep blue with lighter blue shimmer.

Smoke Signals - a nice medium purple, also with a hint of gold shimmer to it.

Bulletproof by Sugarpill. My new favorite matte black.

Rimmel Stay Matte pressed powder. I use this as my highlight when I'm doing super crazy bright eye makeup. It's matte so I don't get a case of the frosties and it works wonders at cleaning up when your lines go a bit wonky (as you will soon see).

My Wolfe Metallix palette. I am using the gold color as a base.

And finally, the brushes. I've shown these only so you get a general idea of the shapes that I've used. These are all e.l.f. brushes (so...super cheap). From left to right they are:
1) a big fat fluffy wedge brush
2) a flat shadow brush (bad picture)
3) a small crease brush
4) a pencil brush
Alright, on with the show! (Goddamn, this post is going to be long as hell.)

First, start off with a naked eye. (Go ahead...sing the Luscious Jackson song...I am.) Make sure you look like someone just punched you in the face and all your freckles can be seen.

Step 1: Cover that shit up. There's no use in everyone thinking you didn't have dinner ready on time. Apply some shadow primer. This is Urban Decay Primer Potion. (And not something naughty as you might have previously thought.) To be on the safe side, I just use it all over my eye up to the brow bone...and I give a little wipe underneath the eye too.

Step 2: I took the gold water activated color from my Wolfe palette, mixed it with a little bit of eye drop solution and patted it on my lid. I kept it fairly low down because this is a cut crease of sorts, and I didn't want the shadow on top going green. Don't mind the smudge under my eye, I have fat fingers.

Step 3: Take a small crease brush (3) and a pretty turquoise, I'm using Ocean Mystery, and do a little Nike Swoosh over your eye lid. I went right into the inner corner and made a bit of a wing on the outer corner.

Step 4: Take a darker blue and the little pencil brush (4) and darken up the lighter blue. I ran it all along the crease and under the eye, paying the most attention to the inner and outer corners.

Step 5: Take the purple and darken up the corners a bit more. Run the purple underneath the outer half of the eye. Take the black and further darken the corners following the wing in the outer bit. (Pay attention, because here's where it starts to look a bit janky.) I used the same brush for all of this. I didn't bother to clean it off cos, frankly, it didn't matter.

Step 6: Since apparently, I don't have this chronology thing down, I skipped a few steps so this is a few in one. Take a yellow shadow (Explode) and the flat shader brush (2) and pat it all along the lid, being careful not to mix it with the blue colors. Then take the big fluffy shadow brush (1) and face powder and clean up your lines. See how much less janky it looks now? I also blend it along the top of the light blue shadow as well as under the brow bone for a nice fade. You can thank Petrilude for showing me that tip.
Next up is lining. I am attempting to show how to create that little winged out eyeliner (it's actually very easy). I use a pen type liquid liner with a stiff felt tip (that's what she said). To get the wing, I line the pen up with my lower lash line and draw a line inwards.

Step 7: Then I connect the point of that line right into the normal liner. I also used a bit of Urban Decay's 24/7 liner in Zero under the eye. Since that is very soft and smudgy, I kept it to the outer half. Just add mascara and you are done! I used Rimmel Sexy Curves as always.
I used this same technique and the Sleek iDivine Palette in Acid on this look:

So there it is. I hope it was helpful! Please let me know what was and what wasn't. I'd like to streamline these as much as possible as I know I am overly verbose.

The End!


4 comments:
I bow down to your makeup knowledge. You are my hero. Come to CA and give me lessons, I will make it worth your while ;)
You've just made want to take out my make up bag and start playing with my eye shadows!
i think you did a great job! my next order with jennifer will be for some of the colors you used. *inspiration* =)
Wow, these are both wonderful looks! I'm definately going to give them both a go! You've got amazing eyelashes.
Post a Comment